I have been experimenting further with the capabilities of my new laser cutter, which has involved methodically testing a number of variables:
- Height of the laser (which determines the focus)
- Materials (different sheets of MDF)
- Number of passes
- Output power
- Speed
I started off performing a ramp test, which showed me where the ideal height for the laser to be positioned above the material should be. However, the "hobby" laser cutter I have purchased (the Neje Laser Master 2S Plus), does not allow the laser to be accurately moved up and down on the Z axis. To move the height of the laser, you need an allen key to unscrew a bolt, which then allows the laser module to be moved. This is not conducive to very fine levels of control because I cannot guarantee that I am moving the laser module by hand a millimetre at a time. So...the ramp test got in me positioned in the right ballpark.
Height/Focusing of the Laser
I performed some cutting tests with it positioned according to the ramp test results and settled on some other variables (5mm/sec and 75% power) for the testing. Because the laser I have is at the low/cheaper end of the output scale, I need to maximise every watt of output to get the best cut, so accurate focusing is important. Rather than moving the laser module any more, it is now screwed firmly into place, but I performed another four height tests by raising and lowering the height of the cutting bed by -1mm, -2mm, +1mm and +2mm to find out whether the focusing could be improved to get better cutting power. I performed cutting tests using 4, 5 and 6 passes at each height too.
As it turned out, the height of the cutting bed in relation to the position of the laser module was spot on, but the test proved that the laser was focused correctly.
Materials
Something else that I discovered whilst testing is the variability in materials. I want to use my laser cutter primarily for cutting sheets of MDF to make buildings for my Band of Brothers Nuenen project, so that is what I have been using for all the tests so far. I had read on various forums that MDF is not consistent in its composition, but even two sheets, which were delivered to me in the same batch from the same manufacturer performed differently. The difference wasn't great (5 passes versus 6 passes to get a really clean cut), but it was different nevertheless, so needs to be accounted for.
Another difference that I was expecting, though not in the way that it turned out, was between 2mm and 3mm MDF. I expected the cutter to require more passes for the 3mm sheets, but it actually required less (4 to 5 passes) than the 2mm. The density of the 3mm is probably lower.
I purchased the 2mm from a supplier in the UK - they are the only place that I have found so far that sells 2mm sheets, though it is excellent value and great service. The 3mm came from a Chinese supplier on Amazon. The 3mm is the lighter sheet on the left; lightness being an indicator of density perhaps?
You can see some of the other tests that I have been performing, trying out different line thicknesses for engraving the detail of the brickwork. The house I am currently designing is "House 3", which looks like this in Band of Brothers:
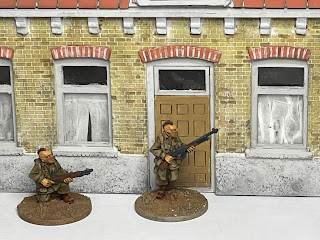
The bricks are a base yellow colour, but have a lot of variability in them. This is what I achieved on my first attempt at engraving and then painting:

The mortar between the bricks was produced by scraping some wall filler (spackle for our American cousins) across the engraved lines, then wiping off the excess before it dried too much. The variability in brick colour is created using some Agrax Earthshade for the darker bricks and a wash of brick red paint for the reddish hues, plus the original yellow base colour (a colour tester pot called "Chueca" from B&Q) to bring out some of the yellow. I think it is going to look awesome on a whole building. The colouring isn't exactly the same as the screen grab from BoB, but the TV producers desaturated the colouring of the film to create visual "atmosphere". I heard that this was a technique pioneered by Steven Spielberg in Saving Private Ryan, so I don't think the colour is ever going to be an exact match for what we see on the screen, but what I have created does look like the brickwork that I have seen in real life in England. The Vincent Van Gogh museum in Nuenen also has a number of bricks (plus red ones) that are similar.
Passes, speed and power
After several tests, only changing one variable at a time, I have settled on 75% power and 5mm per second for cutting. The number of passes depends on the material I am cutting: 6 passes guarantees a clean cut for my 2mm MDF and 5 passes for the lower density 3mm MDF. It is possible to go with one less pass for each material, but the cut sometimes leaves a few tiny bits of MDF that need trimming with a sharp knife.
Progress on House 3
I have been busy all week (2-3 hours every night) designing all the various aspects of House 3. It has been a real challenge figuring out the millimetre perfect detail for each external and internal wall, the positioning of windows and doors, and especially the roof and brickwork. I think that I have almost finished, other than to work on the dormer window and chimneys. Once I have done that, I am going to take the plunge and start cutting everything out. I am reasonably confident that it will all fit together perfectly on the first attempt, but...we'll see!