Showing posts with label Rubicon. Show all posts

Saturday, 8 January 2022

Late war German vehicles

I've been working on a couple more late war German vehicles, a JagdPanther and a Wirbelwind, both kits from Rubicon, for my Iron Cross armies.

The Wirbelwind is based on the chassis of a Panzer IV, so in common with a lot of Rubicon kits, there were plenty of spare parts, so I also built the Panzer IV turret at the same time, so add to the other two Panzer IVs that I built a couple of weeks ago.


I've got a little bit more weathering to do; I've only added a small amount of wet mud so far and will be applying lighter coloured weathering powders over the top. I tried out a different technique for painting the camouflage on this vehicle and I'm not particularly happy with it, so will return to the same technique I used on the Jagdpanther below and most other vehicles that I have been painting over the last year. Unless you try, you don't learn though.

As with the Panzer/Wirbelwind, there is more weathering to done on the Jagdpanther, to which I have applied quite a bit of wet mud. I'm also much happier with how the camouflage turned out.


I had never really taken much notice of the Jagdpanther (preferring the more mainstream Panzer III and IV workhorses for my armies) until I re-watched episode 4 ("Replacements") of Band of Brothers. It's the scene where Easy Company are riding into a Dutch town called Nuenen on some British Shermans and then a Jagdpanther comes roaring out from its camouflaged ambush position.

I immediately thought that I had to get one of those, plus some Shermans for it to fight against. It has also inspired me to get back into making some more terrain loosely based on Nuenen, which is where the scene is (very loosely) based, so that I can recreate the scene on the tabletop. This chap has visited Nuenen and compares the actual town with the Band of Brothers set: Visiting Band of Brothers: The Battle of Nuenen? | WW2 Traveling #5 - YouTube  Obviously, it's a bit different, but I don't think it detracts at all from the BoB series.

Waiting on the production line is a bit of opposition: a platoon of Shermans and a Firefly.

As noted above, there are always spare bits in each Rubicon kit, so with the addition of a tiny bit of plasticard and a few odds and ends out of my Rubicon bits box, I have created a second Jagdpanther in a hull down position. Before I make a start on the Sherman platoon and any Dutch buildings for my fictional recreation of Nuenen, I'll get this painted up.


Plenty to do!

Wednesday, 22 December 2021

Panzer IVs

 I've been slowly building and painting a couple of Panzer IVs for use in either Italy (with field applied camo) or North West Europe. I didn't take any in-progress shots, but here are the finished articles. I say finished...I've been debating with myself for about the last 10 days whether to apply some weathering powder to the tracks and wheels to make them look a bit more dusty. The varnish looks a lot shinier in the photos that IRL too, so a bit of dust would help with that.


I will be starting a Wirbelwind next and have ordered a Jagdpanther and a platoon of Shermans (3 x M4A4 and a Firefly).  All Rubicon models.

Wednesday, 6 October 2021

Finishing off SdKfz.222 and 223

A bit later than planned, I have finished off a pair of reconnaissance vehicles for Iron Cross. These are the Rubicon kits, which allow you to make different variants, so I went with a 222, armed with a 2cm autocannon, and a 223, which is essentially a radio-equipped command vehicle with the "bed frame" antenna.

I have painted both in dunkelgrau, so that I can use them for a variety of early war scenarios. They match a whole load of other vehicles that I have been working on over the last several months. I think that I might continue experimenting with weathering powders to add a bit of dirt and dust to them, like I did on this other Aufklarungs unit.

Here is the SdKfz.222:


And the SdKfz.223:


I do like the Rubicon kits because they have thought about lots of little details when sculpting the models. For example, the bottom of the tyres are flattened off as if they are under load, just like IRL. I don't think I have ever seen any other model maker do this. They also come with loads of decals, which on a plain grey vehicle, bring it to life.

Anyway, my next project is going to be an ambushed, horse-drawn ammunition wagon with loads of casualties.

Thursday, 16 September 2021

Rubicon SdKfz.222 / 223 Kit Build

I've started creating another couple of models to act in a reconnaissance role for games of Iron Cross. I completed a SdKfz.253 last week and have now assembled and undercoated a pair of scout cars.

These are both from the same Rubicon kit, which, as per many of their kits, gives multiple build options. I have built a standard 222 (with 2cm autocannon) and a 223 (with the bed-frame antenna). I have added a bit of extra stowage from my bits box.


I will be painting them in dunkelgrau and using oil paints to burnish the metal hulls, but want to experiment a bit more with weathering powders/pigments. Panzermeister36 has some great video tutorials on Youtube, which I have been watching, demonstrating the various techniques that I will be using (far better than I can explain and with better results!)

More to come soon...

Saturday, 11 September 2021

German Recce Unit

My project this week has been assembling and painting another Rubicon kit, this time a SdKfz 253, which is one of the options from the SdKfz250 (Alte) kit.

I wanted some reconnaissance vehicles to add to my early war German force, which mostly features Panzer IIIs at the moment. I played an Eastern Front Iron Cross scenario against Stuart a couple of months ago and learnt the hard way that advancing tanks against dug-in and hidden T34s does not end well...a few Aufklarungs units screening ahead of the Panzers should prevent a similar catastrophe whenever our next game is.

Some of the extra stowage came out of my bits box, which has accumulated from the various Rubicon kits in my burgeoning collection. One of the things that I really like about the Rubicon kits is that they come with a wide choice of decals. I think that adding the white decals to the plain grey hull brings a lot more life to the model and, from looking at historical photos, many of the vehicles had a lot of markings on them. Researching vehicles is another part of the hobby that I really enjoy and can easily waste several hours on.


Instead of using the chipping technique, which I have started to go off, I have been experimenting with using weathering powders/pigments. I used three colours on this model from MIG Productions and then applied some pigment fixer from AK Interactive. The reason for falling out of love with chipping is that, when viewing photos from WWII, very few vehicles actually appear to have had any chips or scratches; they were dirty, but not damaged in the way that we modellers tend to apply various techniques (hairspray, salt, chipping medium etc)


What I have been doing instead to give the hulls a weathered appearance, prior to applying dirt, is to use lightly diluted oil paints (using enamel thinners) is small patches. I used dots of white, a very bright blue and a very bright green on this model, which when diluted and worked around with a brush give the "metal" a mottled finish. It is difficult to see in these photos, but I think it looks effective.

This model needs a quick blast of Testor's Dullcote to take the shine off it and then it's ready for the gaming table. 

The next Aufklarungs models I am going to work on is a pair of SdKfz 222s, which are lightly armed with a 2cm autocannon; the 253 above is unarmed so only good for uncovering hidden units in Iron Cross whereas the 222s can at least engage infantry for a short time to give the Panzers a bit of time to move forward.

Tuesday, 31 August 2021

Building a Wreck - Final Update (#4)

I finished off my diorama/terrain piece of a burnt out Panzer III this weekend. Here are some more in-progress shots illustrating how I got to finished article. In the last blog, I had got to the stage where I had finished the base, undercoated and then highlighted the tank using my airbrush and then hand-painted the base colours onto the tracks.

In my last post, I had been debating over which of two techniques to follow; in the end I made up my own technique, which combined a bit of both.

After applying the base colours, the next stage was painting the burnt effect onto the tank's rear deck and turret, representing an engine fire. I used two colours for this: Vallejo Model Color USA Olive Drab 70.889 for the first coat and Black 70.950 for the top coat. 


The photo below perhaps best shows how the two colours work together. The whole burnt area was dabbed with a sponge which had been dipped in Olive Drab to create a mottled appearance. The centre of the burnt area was then lightly "over-dabbed" with another piece of sponge dipped in Black. I think that the Olive Drab looks good when representing the slightly charred effect, rather than just using black.


The next coat of paint was Vallejo Game Color Parasite Brown 72.042, which is actually not very brown, much more orange, but a really good proxy for oxidised metal. This was dabbed on using a piece of sponge.


The final base colour, which was dabbed on with a piece of sponge, was Vallejo Model Air Sand (Ivory) 71.075. This was added around the edge of the burnt area.


On the photo below, you can see a bit more modelling that I did. I had already added a deceased crew member onto the front track guard, but following some constructive feedback on the Rubicon Facebook page, I removed one of the arms and re-attached it in a slightly different position. The other arm proved a bit more difficult to manipulate due to the problems with working with hard ABS plastic, so I covered it up with some custom made tarpaulin (tissue paper painted with diluted PVA glue).

The tarpaulin looks a bit translucent in this photo because it is still wet with water and glue.


Another technique that I used was loading a flat-edged paintbrush with diluted white paint and then gently flicking the bristles to lightly spatter white spots on the edge of the burnt area.

The last stage involved using MIG pigment powders and a fixing agent over the top of the base paint layers. The pigment colours were Old Rust (P230), Light Rust (P024) and Light Dust (P027)

Anyway, I think I am calling this finished now, other than to apply some flock and static grass to the base.


If you have any questions about any part of this project, post a question in the Comments section below.

My next (or next but one) project will be a damaged horse-drawn supply wagon with the dead horses and several casualty figures.

Monday, 30 August 2021

Building a Wreck - Update #3

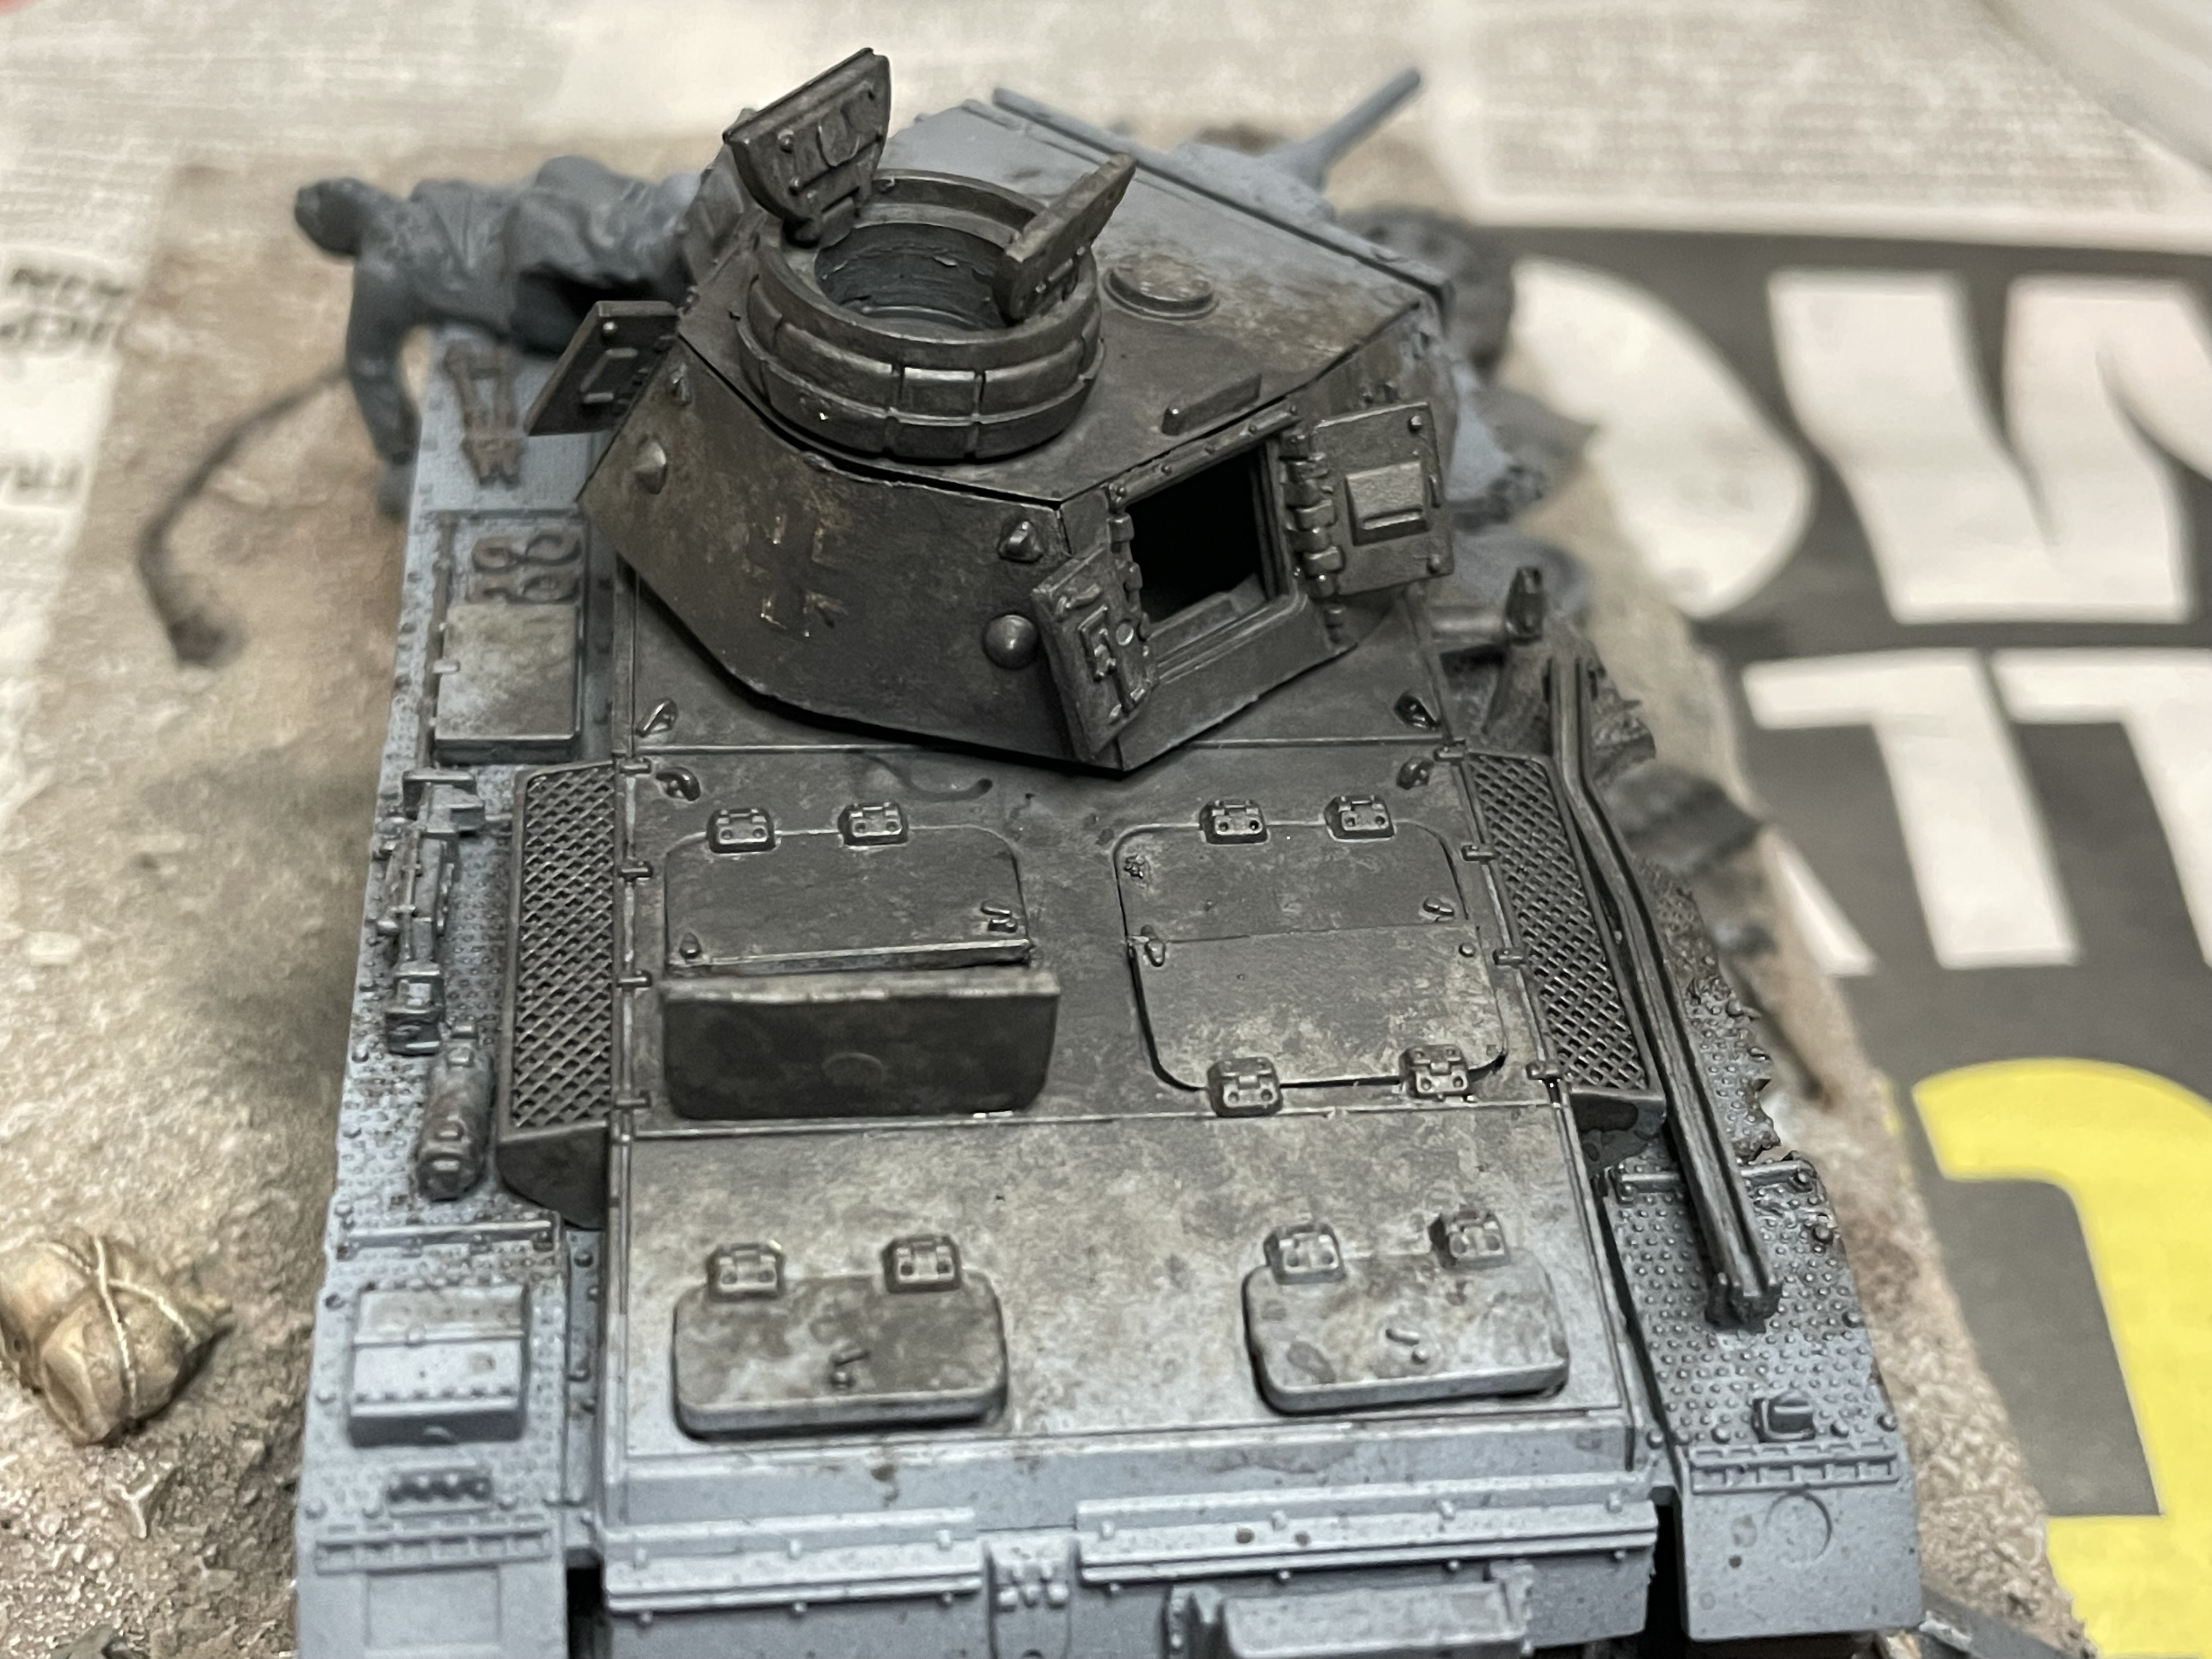
Here are a few in-progress photos of the main model. I've finished the turret here and modelled it with all the hatches open, which seems to be a common feature in photos showing blown-up tanks.


I have glued the turret in place so that I can lift up one side to be a little bit higher, giving the impression when viewed from the opposite side of the more damaged side having collapsed. Snipping off the suspension arms and gluing the three remaining roadwheels higher up the hull also gives the impression of the vehicle having collapsed on one side, which also seems to be another feature from contemporary photos.

A few shots of the tank placed in position on the base. The non-collapsed side of the base was built up a little, maybe only by 5mm, but it adds to the optical illusion of the damaged side sagging.


The model has now had a coat of Halfords grey car primer.


The sagging effect is perfectly depicted in this photo:


I used Vallejo Model Air Panzer Dark Grey 71.056 to give the tank a dark base coat and let it dry. I also sprayed a little onto the base to represent scorching of the ground (the tank is going to be partially burnt out).

The next colour was Dark Grey Blue 71.054, which was applied to most of the upper facing panels, followed by a light highlight of Medium Gunship Grey 71.097 on some of the panel edges and raised areas. Following on what I learned when painting my platoon of Rubicon panzers, I have chosen to slightly overdo the highlighting; once the other effects are applied, the stark highlights become toned down, so being too subtle at this stage is just wasted effort.


I've also hand-painted the tracks and super-glued the tank onto the base. I was worried that I kept catching the delicate piece of towing cable that was attached to the front of the tank and that it was going to break. The bit that was attached to the tank lines up with the larger piece of towing cable that is glued onto the base.  The other delicate piece on the front, that was just waiting to accidentally snapped off, was the bar which was holding the extra track onto the glacis plate. I had made that out of a thin strip of plastic and bent it a bit before attaching to the tank.


The next stage will be to apply the decals, then set the whole thing on fire! However...I can't decide on which technique to use for the burnt effects: either the Vallejo chipping effect or Andy's Hobby Headquarters sponge method.

Next update in this series is here.

Nuenen House #3 Finished?

I thought that I had finished this first house in my Band of Brothers project, but after looking at it on my painting table for the last few...