Tuesday 31 August 2021

Building a Wreck - Final Update (#4)

I finished off my diorama/terrain piece of a burnt out Panzer III this weekend. Here are some more in-progress shots illustrating how I got to finished article. In the last blog, I had got to the stage where I had finished the base, undercoated and then highlighted the tank using my airbrush and then hand-painted the base colours onto the tracks.

In my last post, I had been debating over which of two techniques to follow; in the end I made up my own technique, which combined a bit of both.

After applying the base colours, the next stage was painting the burnt effect onto the tank's rear deck and turret, representing an engine fire. I used two colours for this: Vallejo Model Color USA Olive Drab 70.889 for the first coat and Black 70.950 for the top coat. 


The photo below perhaps best shows how the two colours work together. The whole burnt area was dabbed with a sponge which had been dipped in Olive Drab to create a mottled appearance. The centre of the burnt area was then lightly "over-dabbed" with another piece of sponge dipped in Black. I think that the Olive Drab looks good when representing the slightly charred effect, rather than just using black.


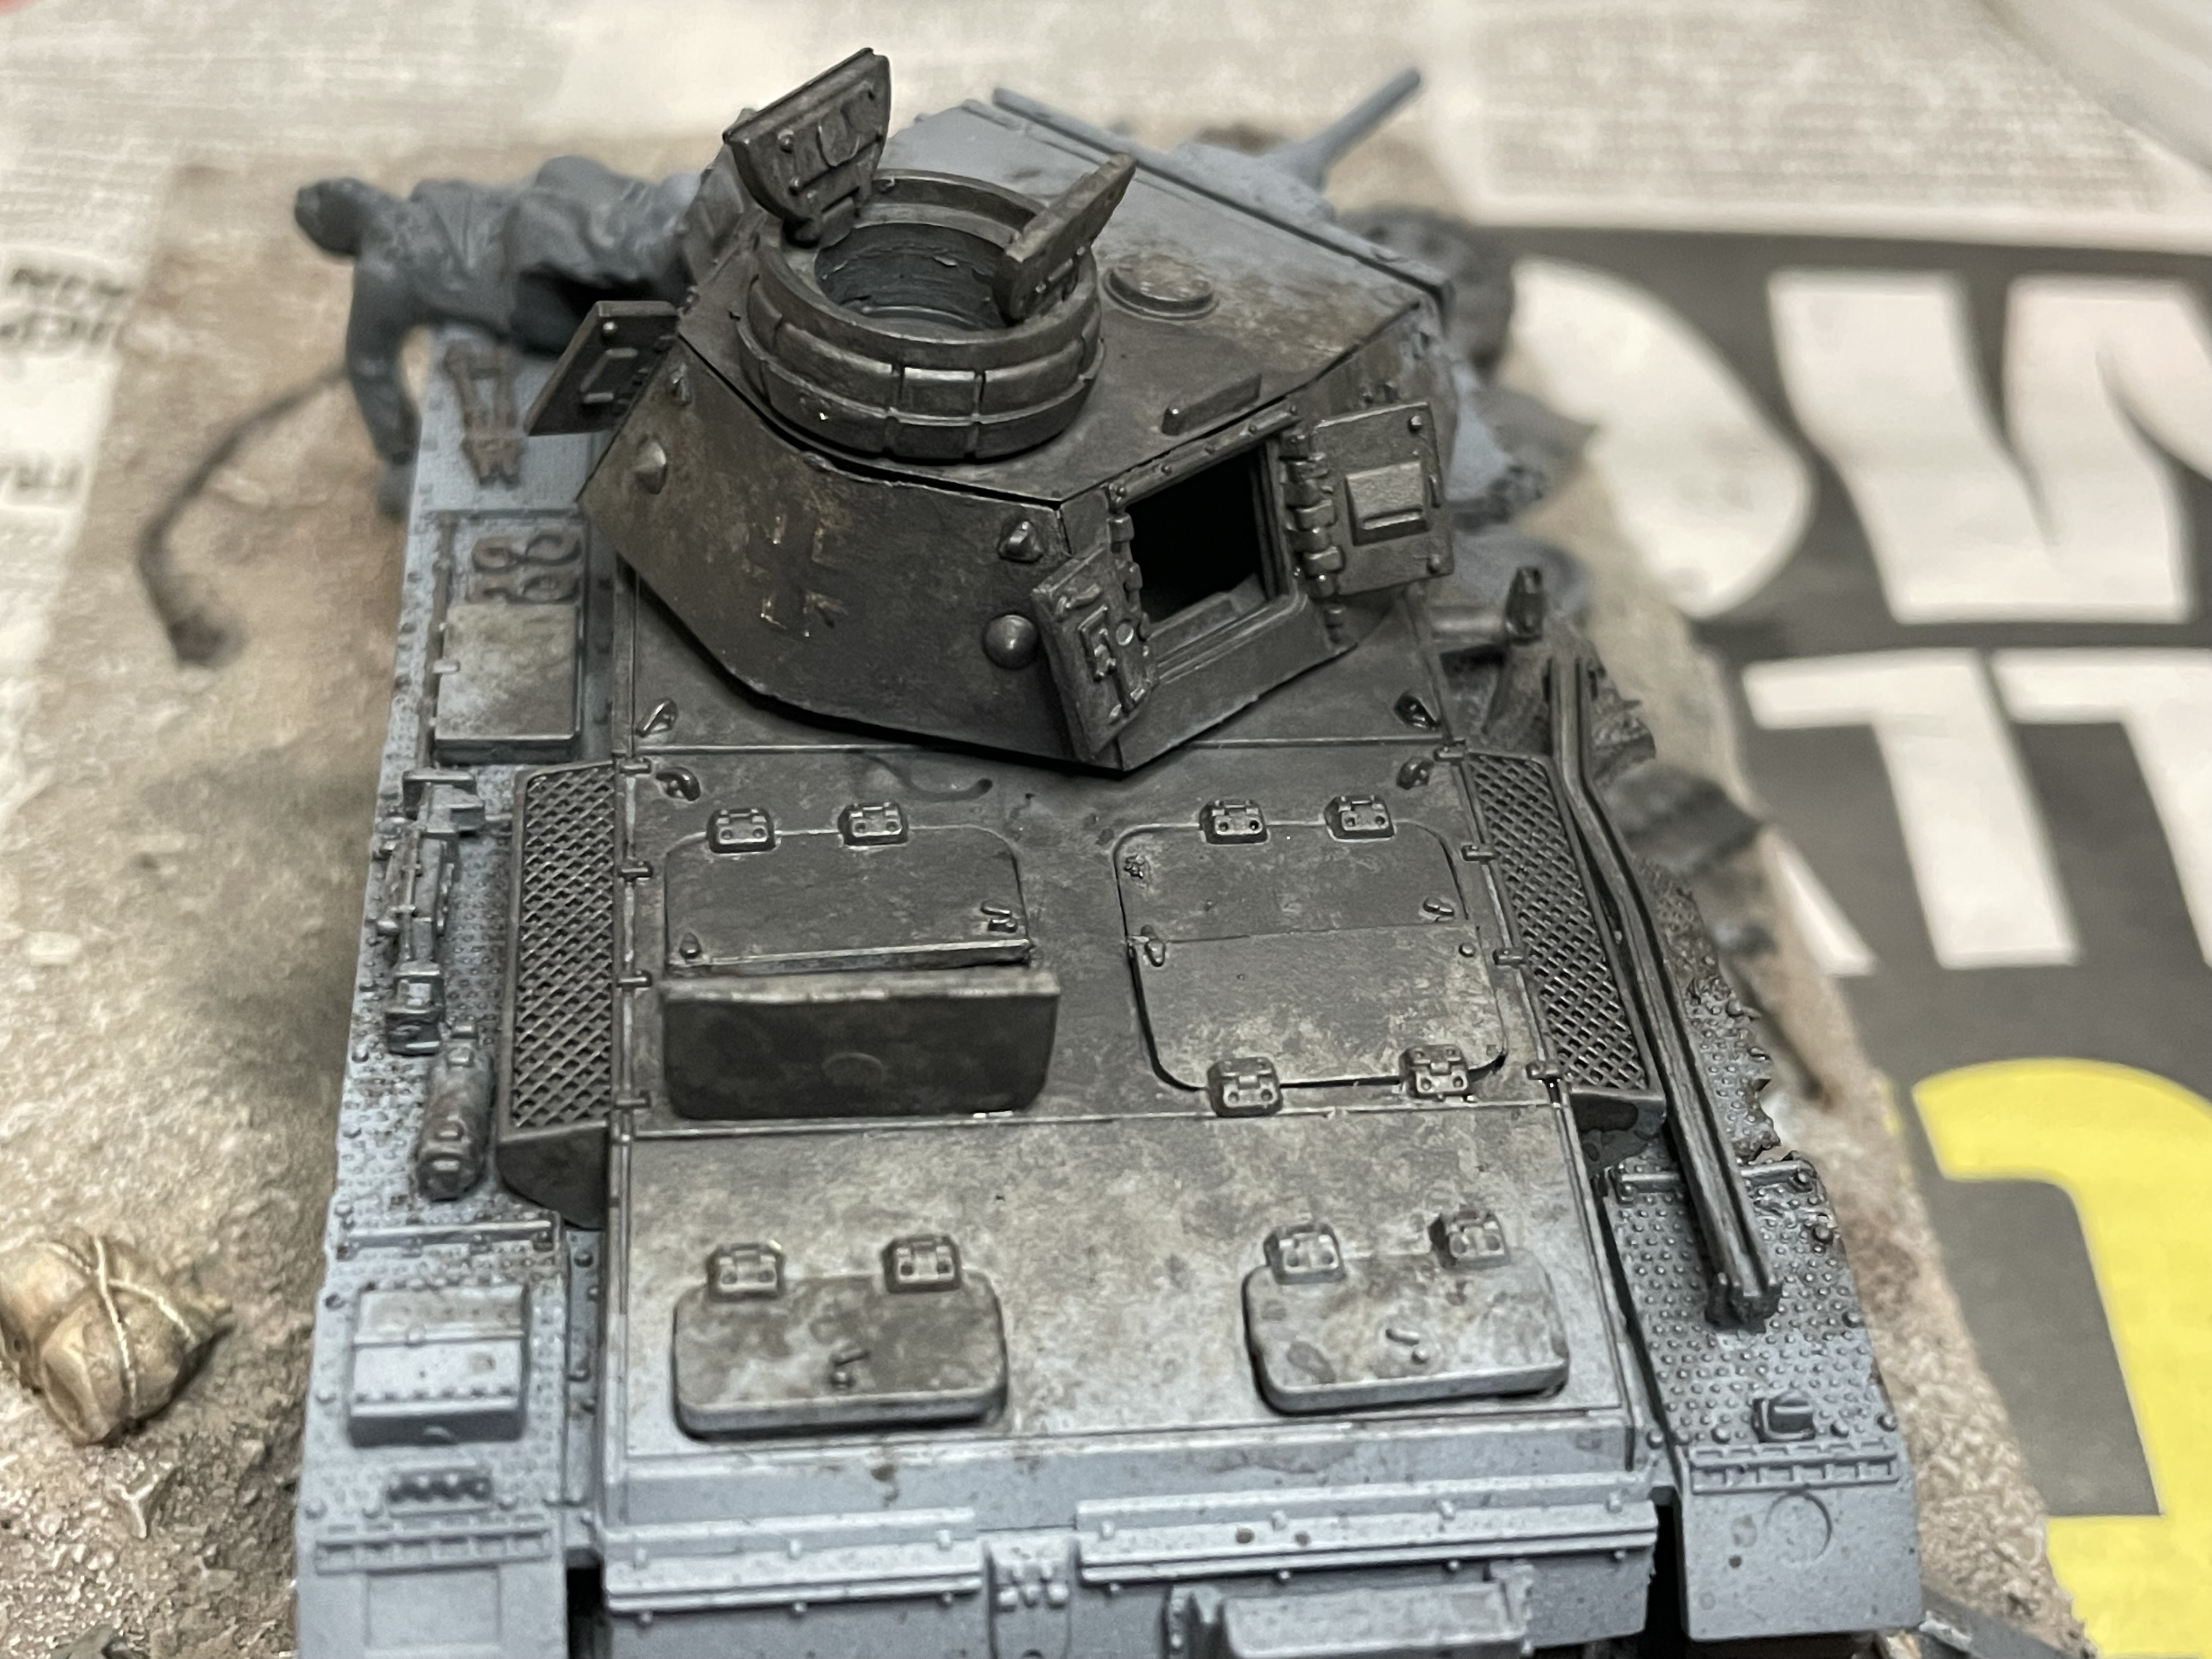
The next coat of paint was Vallejo Game Color Parasite Brown 72.042, which is actually not very brown, much more orange, but a really good proxy for oxidised metal. This was dabbed on using a piece of sponge.


The final base colour, which was dabbed on with a piece of sponge, was Vallejo Model Air Sand (Ivory) 71.075. This was added around the edge of the burnt area.


On the photo below, you can see a bit more modelling that I did. I had already added a deceased crew member onto the front track guard, but following some constructive feedback on the Rubicon Facebook page, I removed one of the arms and re-attached it in a slightly different position. The other arm proved a bit more difficult to manipulate due to the problems with working with hard ABS plastic, so I covered it up with some custom made tarpaulin (tissue paper painted with diluted PVA glue).

The tarpaulin looks a bit translucent in this photo because it is still wet with water and glue.


Another technique that I used was loading a flat-edged paintbrush with diluted white paint and then gently flicking the bristles to lightly spatter white spots on the edge of the burnt area.

The last stage involved using MIG pigment powders and a fixing agent over the top of the base paint layers. The pigment colours were Old Rust (P230), Light Rust (P024) and Light Dust (P027)

Anyway, I think I am calling this finished now, other than to apply some flock and static grass to the base.


If you have any questions about any part of this project, post a question in the Comments section below.

My next (or next but one) project will be a damaged horse-drawn supply wagon with the dead horses and several casualty figures.

Monday 30 August 2021

Building a Wreck - Update #3

Here are a few in-progress photos of the main model. I've finished the turret here and modelled it with all the hatches open, which seems to be a common feature in photos showing blown-up tanks.


I have glued the turret in place so that I can lift up one side to be a little bit higher, giving the impression when viewed from the opposite side of the more damaged side having collapsed. Snipping off the suspension arms and gluing the three remaining roadwheels higher up the hull also gives the impression of the vehicle having collapsed on one side, which also seems to be another feature from contemporary photos.

A few shots of the tank placed in position on the base. The non-collapsed side of the base was built up a little, maybe only by 5mm, but it adds to the optical illusion of the damaged side sagging.


The model has now had a coat of Halfords grey car primer.


The sagging effect is perfectly depicted in this photo:


I used Vallejo Model Air Panzer Dark Grey 71.056 to give the tank a dark base coat and let it dry. I also sprayed a little onto the base to represent scorching of the ground (the tank is going to be partially burnt out).

The next colour was Dark Grey Blue 71.054, which was applied to most of the upper facing panels, followed by a light highlight of Medium Gunship Grey 71.097 on some of the panel edges and raised areas. Following on what I learned when painting my platoon of Rubicon panzers, I have chosen to slightly overdo the highlighting; once the other effects are applied, the stark highlights become toned down, so being too subtle at this stage is just wasted effort.


I've also hand-painted the tracks and super-glued the tank onto the base. I was worried that I kept catching the delicate piece of towing cable that was attached to the front of the tank and that it was going to break. The bit that was attached to the tank lines up with the larger piece of towing cable that is glued onto the base.  The other delicate piece on the front, that was just waiting to accidentally snapped off, was the bar which was holding the extra track onto the glacis plate. I had made that out of a thin strip of plastic and bent it a bit before attaching to the tank.


The next stage will be to apply the decals, then set the whole thing on fire! However...I can't decide on which technique to use for the burnt effects: either the Vallejo chipping effect or Andy's Hobby Headquarters sponge method.

Next update in this series is here.

Sunday 29 August 2021

Building a wreck - Update #2

I've been making some progress this weekend on almost finishing the base off; I will add some vegetation to it once the tank model has been finished and attached to the base, so that I can put track marks in the right place.

I have also found a great video from Vallejo on Youtube, which demonstrates exactly what I want to achieve. There are quite a few videos and tutorials out there, but this is my favourite so far: How to burn out effects on tanks - YouTube  It is also within my capabilities (I think!)

Here are some in-progress shots. I cut a small piece of 3mm MDF for the base and sanded the edges to create a chamfered edge, so that it blends with the gaming table as much as possible. I really detest bases on vehicles, especially 1/56 scale, but because I want to add debris, then a base is a must. 

I layered on some wall filler to create a bit of texture and then sprinkled sand and fine grit onto it. Once dry, I sprayed it with diluted PVA to bind it all together and then, once dry again, sprayed it with grey car body primer from Halfords (my go-to primer for everything). The tank was also primed at the same time.

I chopped up several bits of the model when assembling it to create the debris, plus some selected parts from the sprue, plus a few odds and ends I had in my bits box, such as jerry cans.

After the primer had dried on the base, I super-glued some wreckage and debris onto it and then gave the whole thing a first coat of a pale-ish brown paint (cheap tester pot from B&Q). Once the base coat had dried, I created a wash using a dark chocolate brown paint and dabbed that randomly to create some depth to the colour.  Once that had dried, I lightly dry-brushed a pale cream colour on and picked out some of the larger rocks.

I painted most of the debris in the same colour that the tank will be painted: a dark panzer grey, then gave it a light dry-brush with a pale sand colour to highlight some of the detail. I then used Agrax Earthshade from Citadel to darken the recesses on some of the debris.

Finally, I got out my airbrush and sprayed some dark panzer grey paint in the place where the fire from the tank would have scorched the earth.

The final step for today was to give the whole tank a spray with Vallejo Model Air Panzer Dark Grey 71.056. I'm going to leave that base coat for at least several hours to cure before I start with the next layer of paint.


I'll post up some step-by-step progress shots of the tank model soon.

Latest update here.

Friday 27 August 2021

Building a wreck - Update

I've now made a start on assembling a Rubicon Panzer III (H1 variant) as per my last post and also made a start on destroying it as I go.  It's been sort of fun to imagine how this unfortunate Panzer met its end.

Here are a few in-progress shots. Most of the hull is just the standard, out-of-the-box build, though I have started to cut up the track guards on one side that is going to have most of the battle damage. I have also made a few minor changes such as positioning some of the hatches as if they had blown open as a result of the explosion.  It's a shame that the driver's hatch is moulded as a single piece, though I may retro-fit some other hatches over the top (if I can figure how to do it).


One of the most obvious bits of damage to knocked out tanks is to the tracks. It was surprisingly easy to cut the roadwheels off the tracks. I had been reading up about the melting point of ABS plastic and thinking about how to safely damage the kit without either burning myself or inhaling noxious fumes. A little bit of work with a scalpel and side cutters was all it needed. The hard ABS plastic does not lend itself well to too much customisation, but because I am seeking to damage the vehicle anyway, a little bit of actual damage to the kit does not matter quite so much.


The most fun part so far has been chopping up the track links and repositioning them into what you see below. The middle and central return rollers were moved leftwards by one position, which allowed me to bend the intervening track; the left-most return roller was then positioned (with all the track removed from it) in the right-most position and glued on at an angle.  The other parts of the track were attached as a separate pieces, though it is difficult to tell that they don't actually all join up any more.

The three remaining roadwheels are not attached to the bogeys, which were cut off, but glued on higher up the hull to represent the suspension having sagged.

More to come soon.

Latest update here.

Wednesday 25 August 2021

Back to the hobby...building a wreck

Due to the abatement of the Covid lockdown rules, I've had a few months away from the hobby and been getting outdoors as much as possible, visiting friends and family, going out for meals, having one or two games of Iron Cross and generally trying to make the most of "real life".

However, after a bit of a break, I've decided to come back with a bit of tank modelling. I have fancied creating a burnt-out tank as a terrain piece for a while now, so thought that I would give that a crack. It also coincides with getting my 12 year interested in putting together models; he built his first kit last week (a Revell Star Wars Star Destroyer) and is now itching to make more, so I feel like I have accomplished something already.

I purchased a platoon of Panzers from Rubicon earlier this year and built an army for Iron Cross around them, so thought that I would create a wrecked Panzer III to place on the same gaming table. I think that I might also add a load of German casualty figures from Great Escape Games, some dead horses and a wrecked horse-drawn wagon to a series of diorama/terrain pieces.

I've started with a new Rubicon Panzer III kit and intend to assemble it in a part-destroyed state, but then paint it as a burnt-out wreck.

This is the sort of effect that I intend to replicate:


I'll post up some photos of the work-in-progress as I go.

Update 27th August: I've posted up some WIP progress shots up.

Nuenen House #3 Finished?

I thought that I had finished this first house in my Band of Brothers project, but after looking at it on my painting table for the last few...