Showing posts with label painting. Show all posts

Wednesday, 23 February 2022

Nuenen House #3 Finished?

I thought that I had finished this first house in my Band of Brothers project, but after looking at it on my painting table for the last few days, I'm not sure it is finished. I think that I have put my finger on the source of the problem: the roof tiles are too clean and don't match the rest of the building, so probably need a bit of weathering to blend them in. I might also paint a few more of the individual bricks too; the two ends of the house are a bit plain whereas I think the two long sides look better with a higher proportion of darker bricks.


Rather than just taking photos of the buildings, I thought that having some figures next to them, to indicate the size and scale, would help set them off.  So, I've bought a platoon's worth of the 82nd Airborne.

These are the first American Airborne that I have painted, so I painted up the two Pathfinder figures first and tried out some colour schemes on them to work out how I would paint the rest. If they didn't work out, then I probably wouldn't use them in a game anyway. My issue with the Pathfinder figures is that they all have mohawks! Is this just a WWII myth? Was there a photo of just a couple of guys from the Pathfinders with crazy haircuts, which has influenced everyone's perception of them ever since, or was this actually really common?
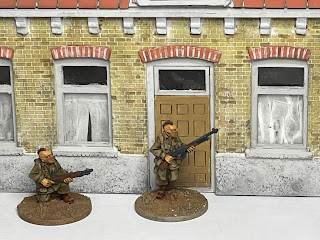

I've also been trying out a new painting technique, which I think looks OK so far. It doesn't involve slapping loads of Agrax Earthshade over the whole model!

I plan to paint up 16 figures and then get back onto designing, architecting, cutting and building the next building in Nuenen.

Wednesday, 16 February 2022

Progress on Nuenen House #3

This is the first house from my Band of Brothers Nuenen project, but I've called it House #3 based on its map location. I realise that this is nowhere near as exciting for anyone other than me - it's just another MDF kit building - but for me it has grown from an idea into something that is almost ready to place on the wargaming table.

Progress is being made! The roofers need to fit the tiles :-) but all the walls are up and in the process of being finished off. Once I have added the mortar to the bricks on the chimney, I will then affix the pre-cut tiles. Here is one elevation with the base colour painted on and mortar added to the brickwork.

It has taken several weeks to get to this point and I have learned many more lessons on the way, so the next building will inevitably be better and take less time to complete. This was the first piece off the laser cutter, about a week ago; I painted the edges of the internal window frames prior to assembling it just to make it a bit easier.


Here is the interior view of the same piece with the "glazing" added.


And the same piece from the outside.


This shot shows the window cills; it also shows where I forgot to switch on the air assist for the laser cutter when it was engraving the brick courses: it has left a burnt residue!


One lesson: I didn't account for the extra 2mm required for the base, so there are some small gaps where the walls are supposed to slot into place.


Starting to take shape; this is the four internal walls glued to the base.


The first of the exterior walls glued onto the interior face.


And another external wall in place.


Once all the walls had dried, I attached the gable ends and started to paint the base colour. It is quite a bright yellow ("Chueca" from B&Q) when it first goes on, but it does dull down once the "mortar" is applied.


Really starting to look like a house now, with the roof, chimneys, dormer window and decorative brickwork added, plus the base colour painted all over. I've also affixed thin card, again cut to near perfection by the laser, to the bottom of the house beneath the line of the windows. I need to allow for an extra millimetre when cutting due to the thickness of the "kerf".


A close-up shot of one wall. Note that the base colour is not uniformly applied, which is by design because it makes the final brickwork look more natural and weathered.


Once the "mortar" has been applied, it looks a lot more faded ,weathered and irregular.


The last bit of laser cutting I have done for this house was to cut (and then paint) some brick arches to fit above the windows and doors. The mortar needs to be applied to these too, which will lighten the brick colour.


The end is in sight for this building, so I've ordered up some Artizan US paratroopers from Great Escape Games, so that I can take some photos with Easy Company in the foreground.

Saturday, 8 January 2022

Late war German vehicles

I've been working on a couple more late war German vehicles, a JagdPanther and a Wirbelwind, both kits from Rubicon, for my Iron Cross armies.

The Wirbelwind is based on the chassis of a Panzer IV, so in common with a lot of Rubicon kits, there were plenty of spare parts, so I also built the Panzer IV turret at the same time, so add to the other two Panzer IVs that I built a couple of weeks ago.


I've got a little bit more weathering to do; I've only added a small amount of wet mud so far and will be applying lighter coloured weathering powders over the top. I tried out a different technique for painting the camouflage on this vehicle and I'm not particularly happy with it, so will return to the same technique I used on the Jagdpanther below and most other vehicles that I have been painting over the last year. Unless you try, you don't learn though.

As with the Panzer/Wirbelwind, there is more weathering to done on the Jagdpanther, to which I have applied quite a bit of wet mud. I'm also much happier with how the camouflage turned out.


I had never really taken much notice of the Jagdpanther (preferring the more mainstream Panzer III and IV workhorses for my armies) until I re-watched episode 4 ("Replacements") of Band of Brothers. It's the scene where Easy Company are riding into a Dutch town called Nuenen on some British Shermans and then a Jagdpanther comes roaring out from its camouflaged ambush position.

I immediately thought that I had to get one of those, plus some Shermans for it to fight against. It has also inspired me to get back into making some more terrain loosely based on Nuenen, which is where the scene is (very loosely) based, so that I can recreate the scene on the tabletop. This chap has visited Nuenen and compares the actual town with the Band of Brothers set: Visiting Band of Brothers: The Battle of Nuenen? | WW2 Traveling #5 - YouTube  Obviously, it's a bit different, but I don't think it detracts at all from the BoB series.

Waiting on the production line is a bit of opposition: a platoon of Shermans and a Firefly.

As noted above, there are always spare bits in each Rubicon kit, so with the addition of a tiny bit of plasticard and a few odds and ends out of my Rubicon bits box, I have created a second Jagdpanther in a hull down position. Before I make a start on the Sherman platoon and any Dutch buildings for my fictional recreation of Nuenen, I'll get this painted up.


Plenty to do!

Wednesday, 22 December 2021

Panzer IVs

 I've been slowly building and painting a couple of Panzer IVs for use in either Italy (with field applied camo) or North West Europe. I didn't take any in-progress shots, but here are the finished articles. I say finished...I've been debating with myself for about the last 10 days whether to apply some weathering powder to the tracks and wheels to make them look a bit more dusty. The varnish looks a lot shinier in the photos that IRL too, so a bit of dust would help with that.


I will be starting a Wirbelwind next and have ordered a Jagdpanther and a platoon of Shermans (3 x M4A4 and a Firefly).  All Rubicon models.

Saturday, 13 November 2021

Finishing off Allied vehicles

These models have been sat in my cupboard for years, so I made a start on finishing them off a few months ago (just checked and it was March!!!), and picked them up again back in October. Anyway, they now complete...apart from painting the crews for the carriers.

My British Mediterranean forces now have some armour in the form of 2 x Vickers Mk.VI and 2 x A13 Cruisers, plus 3 x carriers for moving infantry around the battlefield.


I attempted a Caunter pattern on the carriers, which looks accurate based on some photos I found of British troops in Greece, but perhaps less accurate on the A13s; I couldn't find any suitable reference photos for them, so made it up a bit.


Sunday, 17 October 2021

Finishing off British forces in the Mediterranean

Some of the stuff featured in this post has been on my painting table (actually, in the cupboard) part finished for a few years. I did a little bit of work on them a few months ago, but have decided to crack on and get them finished. I've had a weekend of finishing things off, partly inspired by the new range of Greek miniatures that Great Escape Games are about to launch. I've already got a platoon of Greek Mountain Infantry, plus plenty of support weapons including a pair of CV-35 tankettes, but inevitably I'll end up with some of the new range when they become available.

I finished off basing all my Greeks, plus some Gebirgsjager and some British infantry yesterday.


The stuff from the cupboard includes 3 x Bren carriers, which are actually finished except for painting the crews, a pair of A13 Cruisers and a pair of Vickers Light Tanks MkVI. The idea is to use them for scenarios set in North Africa, Sicily, Greece and perhaps even Italy.

I tried out the Caunter camo scheme on the carriers first of all because they had fewer lumps and bumps that needed masking prior to spraying with the airbrush.


I then made a start on applying Caunter to the A13s, but then put them down again a few months ago after getting this far.

The paints are Vallejo Model Air and come from a set called British Caunter Colors. The base colour is 71.288 Portland Stone, the lighter green is 71.401 Silver Grey and the dark green is 71.012 Dark Green.

I masked off another section and applied another thick stripe of Silver Grey today. One trick that I have learnt when applying the masking tape (well, two tips) is to stick the masking tape to your trousers a few times to take a lot of the stickiness out of it, otherwise it sticks to the paint too well, which brings me onto tip #2. When removing the tape, pull it as gently as you can and go as slowly as you can, otherwise it will pull off flakes of the base coat.


This thicker light green stripe is going to have another dark green stripe painted inside it, but I need to leave this one to dry for several days, otherwise risk pulling parts of it with the next application of masking tape.


The other tanks that I will make a start on finishing(!) are a pair of Vickers Mk.VIb's. I had got as far as painting on the base colour, which I think is Vallejo Model Color Iraqi Sand. I'm not 100% sure what I am going to do with them yet, but definitely not Caunter because of the difficulty of masking all the various panels.

All of the models featured in this post are made by Blitzkrieg Miniatures.

Nuenen House #3 Finished?

I thought that I had finished this first house in my Band of Brothers project, but after looking at it on my painting table for the last few...