Saturday, 8 January 2022

Late war German vehicles

I've been working on a couple more late war German vehicles, a JagdPanther and a Wirbelwind, both kits from Rubicon, for my Iron Cross armies.

The Wirbelwind is based on the chassis of a Panzer IV, so in common with a lot of Rubicon kits, there were plenty of spare parts, so I also built the Panzer IV turret at the same time, so add to the other two Panzer IVs that I built a couple of weeks ago.


I've got a little bit more weathering to do; I've only added a small amount of wet mud so far and will be applying lighter coloured weathering powders over the top. I tried out a different technique for painting the camouflage on this vehicle and I'm not particularly happy with it, so will return to the same technique I used on the Jagdpanther below and most other vehicles that I have been painting over the last year. Unless you try, you don't learn though.

As with the Panzer/Wirbelwind, there is more weathering to done on the Jagdpanther, to which I have applied quite a bit of wet mud. I'm also much happier with how the camouflage turned out.


I had never really taken much notice of the Jagdpanther (preferring the more mainstream Panzer III and IV workhorses for my armies) until I re-watched episode 4 ("Replacements") of Band of Brothers. It's the scene where Easy Company are riding into a Dutch town called Nuenen on some British Shermans and then a Jagdpanther comes roaring out from its camouflaged ambush position.

I immediately thought that I had to get one of those, plus some Shermans for it to fight against. It has also inspired me to get back into making some more terrain loosely based on Nuenen, which is where the scene is (very loosely) based, so that I can recreate the scene on the tabletop. This chap has visited Nuenen and compares the actual town with the Band of Brothers set: Visiting Band of Brothers: The Battle of Nuenen? | WW2 Traveling #5 - YouTube  Obviously, it's a bit different, but I don't think it detracts at all from the BoB series.

Waiting on the production line is a bit of opposition: a platoon of Shermans and a Firefly.

As noted above, there are always spare bits in each Rubicon kit, so with the addition of a tiny bit of plasticard and a few odds and ends out of my Rubicon bits box, I have created a second Jagdpanther in a hull down position. Before I make a start on the Sherman platoon and any Dutch buildings for my fictional recreation of Nuenen, I'll get this painted up.


Plenty to do!

Monday, 3 January 2022

AAR - Operation Weserübung

I've had a great afternoon's gaming versus Stuart playing an Iron Cross scenario loosely based on Operation Weserübung, the German invasion of Denmark on 9th April, 1940, which lasted approximately 6 hours before the Danes capitulated. I was attacking with 400 points of a fully motorised Aufklarungsabteilung of the 198th Infantry Division.  Stuart was defending with 200 points of partly mobile Danish infantry - he fielded a mixture of motorcycle and bicycle troops, plus a couple of units of foot-sloggers.

The order of battle for the Germans was:

  • Infantry HQ
  • 7 x Infantry
  • Heavy machine gun
  • Mortar
    • All of the above infantry and support units were mounted in either trucks, half tracks or on motorcycles
  • 2 x Panzer 38(t)
  • 2 x SdKfz.222 scout cars
The order of battle for the Danish was:
  • Infantry HQ
  • 2 x infantry on bicycles
  • 2 x infantry on foot
  • Autocannon mounted on a motorcycle
  • Heavy machine gun
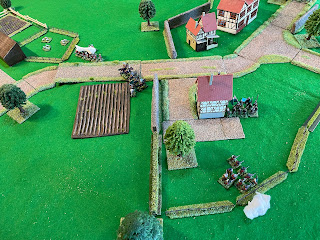
We played the Capture scenario, which meant that the Danes were hidden at the start of the game and could benefit from the new Ambush rule. It also meant that, as defender, Stuart rolled for additional command tokens at the start of each new turn, something he excelled at! The mission objective for the attacking Germans was to capture the white house (and gate across the road) to the bottom-right of the photo below; the start line was the table edge at the top of the photo.

Please excuse the un-Danish looking terrain...we only decided the night prior to the game that we were going to give Stuart's Danes a run-out, otherwise I would have prepared something a bit better than French buildings on a Mediterranean table. Having said that, I don't think it looked too bad. The Danish troops looked absolutely ace though.

In the first turn, the majority of the German forces deployed onto the table and moved forward, leaving one-third in reserve. On the left flank, astride the road, the two Panzers and two units of infantry in half-tracks advanced incautiously because they had not yet spotted any opposing forces. As they neared some likely points of resistance, the infantry dismounted and took up firing positions.

On the right flank, the two scout cars and two units of motorcycle infantry moved forwards towards the edge of a dense woodland.

As soon as the grenadiers had dismounted from their half-tracks they came under intense fire from hidden Danish forces; a vicious, close range firefight erupted. The 38(t) moved up to provide fire support for the grenadiers, but was then engaged by a Danish anti-tank weapon.


The defenders' second line then opened up adding more weight of fire to the now-isolated Germans.

Emboldened by the success of their opening ambush, the Danish command squad, replete with bugler, charged down the main road to encourage his front line soldiers in the defence of their homeland.

The German front line started to dissolve when a unit of Danes on bicycles pedalled hard towards their flank, dismounted and started to pour more fire onto the isolated infantry unit. The morale tokens were piling up on my infantry and despite trying to recover them with Company Morale Tests (lots of ones were rolled!), things started to look dire.

The anti-tank gun scored a direct hit on the Panzer causing it to explode and burst into flames; meanwhile the grenadiers succumbed to the combined weight of fire from the Danes and were destroyed. 2-0 to the Danes by the end of the first turn!  We were playing a new rule regarding hidden units being able to fire in ambush, without being interrupted, which worked out well for Stuart, but not so much for me. The game mechanics felt right though.

The second turn meant that the German commander could bring up his reserves: three units of infantry and the HMG moved up the road and joined in the battle on the German's left flank. One unit occupied the top floor of the house, which gave them a superior firing position and the HMG set up and started laying down some withering fire. The Danish bicycle troops made a sharp exit by slinging their bikes over the hedge and pedalling for all they were worth down the road back towards their own lines.

The newly arrived German infantry, ably supported by the mortar and HMG, started to make their superior numbers felt and caused the Danish soldiers to slowly fall back bit by bit as they took casualties...the AT gun roared off down the road to take up a new position. 

They put up stiff resistance all the way though, not least due to the number of sixes that Stuart rolled when taking Company Morale Tests. I only managed to roll one 6 all game, despite probably taking a few dozen CMTs throughout ;-(

Further support arrived on the left flank in the form of more mounted infantry to keep up the pressure. However, despite their overwhelming numbers, the Germans could not get into gear to mount a convincing attack; too many units suffered from morale problems and could just not get a break when taking morale tests.

Meanwhile, whilst this action was taking place, the leading German motorcycle troops were racing around the right-hand side of the forest in an attempt to outflank the Danes and get into their rear.


A second troop was hot on their heels.

In the centre, the two scout cars were trying to provide some support to the suppressed infantry, but also trading shots with the Danish AT gun. Given the morale problems elsewhere on the battlefield, the German commander decided to pull the scout cars back behind the cover of the building in the middle of the battlefield where they could continue to provide some fire support, but without being mortally threatened by the AT gun.

To counter this new threat in their rear, the Danes hustled an infantry squad back down the road and took up a defensive position next to the gate.

Back on the left flank, the enfilading fire slowly took its toll on the Danish infantry with casualties starting to mount. The battle was now starting to turn in favour of the attackers.


The Danes took up positions behind walls adjacent to the house on the main road.

With the Danish perimeter starting to collapse, the German commander ordered his units forward in a concerted attack. The scout cars moved forward and combined their fire with the mortar, which proved to be deadly accurate, and eliminated the AT gun. Next in their sights was the Danish HMG, which kept up a significant rate of fire and held the centre of the battlefield for most of the battle.


The perimeter continued to draw closer and closer to the house, with significant morale markers being inflicted onto the Danes, but only for them to be recovered again. I blame the bugler!


The coup-de-grace was delivered by the now-dismounted motorcyclists who destroyed the last Danish infantry squad, who had been valiantly defending the gate.

Overall, this was a really enjoyable game, not least because I managed to achieve a rare win over Stuart. We road-tested a few Iron Cross rules amendments too, which I will post about another time.

Wednesday, 22 December 2021

Panzer IVs

 I've been slowly building and painting a couple of Panzer IVs for use in either Italy (with field applied camo) or North West Europe. I didn't take any in-progress shots, but here are the finished articles. I say finished...I've been debating with myself for about the last 10 days whether to apply some weathering powder to the tracks and wheels to make them look a bit more dusty. The varnish looks a lot shinier in the photos that IRL too, so a bit of dust would help with that.


I will be starting a Wirbelwind next and have ordered a Jagdpanther and a platoon of Shermans (3 x M4A4 and a Firefly).  All Rubicon models.

Monday, 15 November 2021

Interactive online WWII maps

I thought that I would deviate a little from my standard content today and share a couple of web sites that I have stumbled upon this week, which should be fascinating to anyone who is interested in WWII.

The first looks like it has been a labour of love for its author and is written in Italian, but due to the magic of modern web browsers, gets translated into English. There is plenty of articles about the history of the Upper Tiber region of Italy, which saw plenty of fighting during WWII. Check out Fascism, War and Resistance - History Tifernate and more by Alvaro Tacchini (storiatifernate.it) 

Even better is the interactive map, which shows all sorts of useful information about the war in this region of Italy. Worth a visit!

I found out about the second mapping site from the We Have Ways of Making You Talk podcast (again, an absolute must for anyone with an interest in WWII). Starting at approximately 20 minutes into episode 389 of the podcast, James and Al start talking about an interactive mapping site called Project 44, which is a highly-polished looking site created by the Canadian Research and Mapping Agency. As you might expect from the name of the organisation, it is heavily focused on the Canadian experience. You can get lost in this site for hours at a time.

Another site that I discovered from the WHWoMYT pod is Military History Visualized - Offical Homepage for the YouTube Channel. The Austrian chap behind this site dives deeply into a lot of German language history featuring topics such as German squad tactics, the German perspective of the battle for Monte Cassino, workings of a Panzerfaust and detailed analysis of German weapons and vehicles. His Youtube channel is perhaps the most accessible place to start: Military History Visualized - YouTube

Saturday, 13 November 2021

Finishing off Allied vehicles

These models have been sat in my cupboard for years, so I made a start on finishing them off a few months ago (just checked and it was March!!!), and picked them up again back in October. Anyway, they now complete...apart from painting the crews for the carriers.

My British Mediterranean forces now have some armour in the form of 2 x Vickers Mk.VI and 2 x A13 Cruisers, plus 3 x carriers for moving infantry around the battlefield.


I attempted a Caunter pattern on the carriers, which looks accurate based on some photos I found of British troops in Greece, but perhaps less accurate on the A13s; I couldn't find any suitable reference photos for them, so made it up a bit.


Monday, 25 October 2021

AAR - Pikes and Panzers

A two-for-one after-action report today: a game of Pikeman's Lament followed by Iron Cross. (Scroll down for the Panzers)

Russell brought his 15mm miniatures and terrain over to the shed for a game of English Civil War using the Pikeman's Lament ruleset. PL is really easy to pick up, but provides some fun gaming as the uncertainty about passing the various activation tests means that nothing ever quite turns out as you want it to. Not knowing much about the ECW period hasn't really hampered me either: I've managed to win a couple of games out of the few that we have played over the last couple of months.

We both started with 24 points of troops, plus an officer, as per the rules, though because Russell had some "Commanded Shot" units, he had one more unit on the table than me. I had two units of Trotters (slower cavalry with guns), two units of pikes and two units of muskets, which I deployed on my table edge.


Russell advanced a lot more quickly (better dice rolling), so managed to bring his Commanded Shot into range quite quickly.


On unit of my pikes pushed forward as quickly as possible intending to have a "push of pikes", but never quite made it as far as his pikemen because of the infernal Commanded Shot.

On the other side of the table, my Trotters held off his Gallopers for a couple of turns, though after several turns of ineffectual combat, I lost one too many units (after Wavering) and my army routed from the battlefield.

Thankfully, my knowledge of WWII permits to write a more informed after-action report of a game of Iron Cross. We played the Capture scenario again, but with me taking the role of defender (Greeks) this time versus Russell as the attacker, who had a very well equipped Panzer army. 

All of my defenders started the game hidden, which caused the advancing Germans to cautiously move forward. The centre of the gaming table had a church surrounded by a stone wall, with an incomplete barbed wire fence flanked by trees and vineyards off to either flank.

I used my new terrain pieces on this board, which provided a bit of cover for the attackers.


One of the great advantages of being a hidden defender is that you get lots of dummy tokens to place around the battlefield.

As soon as some German infantry disembarked from their transport, the Greek sniper opened up from behind the church bell tower...where else are snipers supposed to go?  He successfully engaged the infantry placing down plenty of accurate shots before he was spotted. The heavy machine gun, also placed within the compound, opened up on the same units causing lots of damage.

A couple of turns into the game, the Germans started advancing on a broad front, necessitating the revealing of more hidden Greek troops. The supporting panzers were still hanging back near their starting point trading shots with a single anti-tank gun.

With the German attack stalling, Hauptman Russ ordered his scout units forward, only for them to stumble onto a hidden anti-tank rifle.

In the centre of the battleground, the Greeks, sensing victory, skirmished forward aggressively.

However, on their right flank, things started to turn sour. The Greek infantry faced panzers crashing through the barbed wire, their commander having foolishly chosen to place all his anti-tank weapons in the centre and left of the battlefield.

Back in the centre, the Greeks rapidly deployed additional units in form of some captured Italian CV-35 light tanks to start putting an increasing weight of fire onto the German infantry.

On the left flank, a couple of units of infantry and an anti-tank rifle caused more casualties to the German motorised units, who were lacking infantry support, who were in turn suffering a pounding from the resilient Greeks.

The gap in the right flank was plugged following the rapid redeployment of a mountain gun and some additional infantry units.

Late in the game, the Greeks, with their blood up, advanced incautiously and broke through the German line causing a rout.

The Greeks certainly benefited from being dug in and hidden for the first couple of turns, which enabled me to reactivate just a couple of units many times (and take several important morale checks), which slowed the German advance sufficiently. Another fun game and, unusually, one that I won!

Nuenen House #3 Finished?

I thought that I had finished this first house in my Band of Brothers project, but after looking at it on my painting table for the last few...